RSS

Blog

TIPS and TRICKS for NEWBIES – the turnaround of odd-count flat peyote - part 1

Once you master the even-count flat peyote stitch, you surely want to give the odd-count peyote a try as it also permits to create a diagonal.

Basically, you start in the same way as with the even-count peyote, but with an odd number of beads.

odd-count flat peyote for beginners

Challenge:

Gaining insight into how to fix the odd-count edge bead.

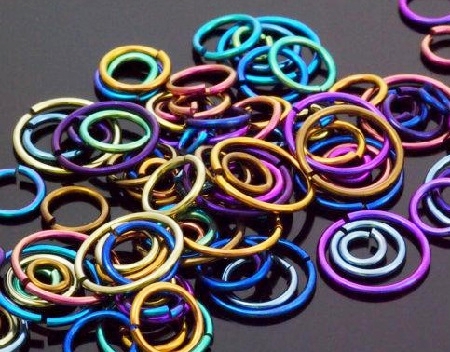
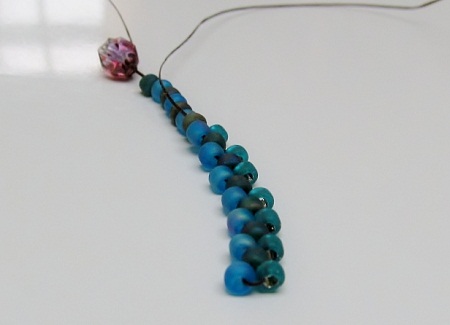
Supplies for a sample :

  • Delica 11/0 in two colors
  • the number of beads you set-up corresponds to the total of the first and second row together
  • S-lon thread D
  • James John needles no. 12
  • scissors and a beading surface

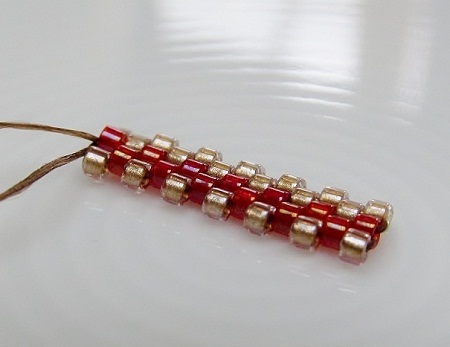
Weaving instructions for a sample in odd-count flat peyote:

  • take a comfortable length of thread
  • leave a long tail end, about 15 cm
  • add on a seed bead and go twice through it in order to fix the first bead
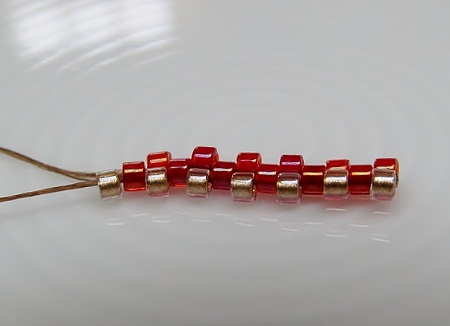
  • string an odd number of beads

odd-count flat peyote - starting

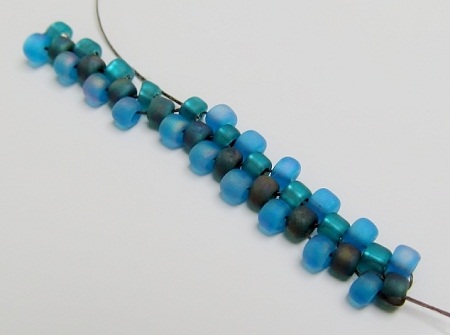
  • create the second row while weaving the third row: pick up one bead, skip one and go through the second bead, pick up one bead, skip one and to through the next bead, continue till you reach the end of the row
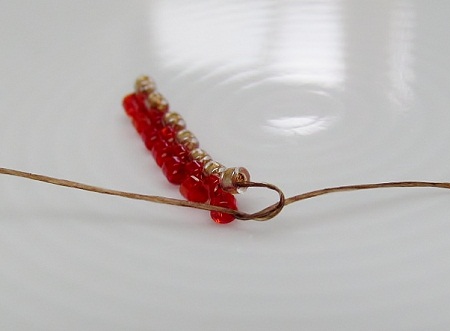
  • when you arrive at the end you will find out that you are no longer able to secure a bead between two other beads, as you miss a step-up bead
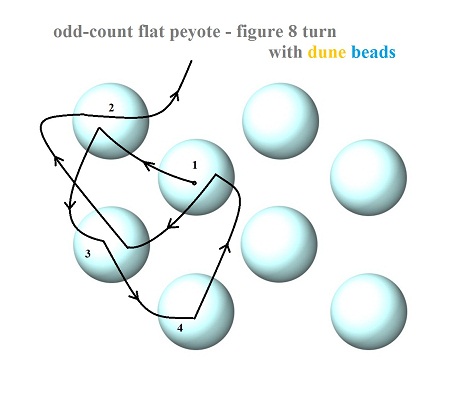
  • there are two techniques to fix the problem: the traditional turnaround and the figure 8 turn
  • note: all the odd-count bead turns will be situated at the tail side

odd-count flat peyote - 1st, 2nd and 3th row

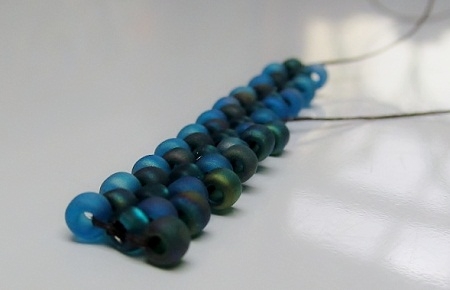
The traditional turnaround:

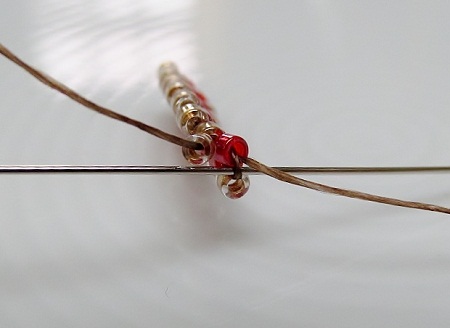
  • in the traditional way you use the thread of the previous round to turn and make the step-up
  • for the first about-turn you pick up the last bead of the third row, after which you make a knot using the tail end
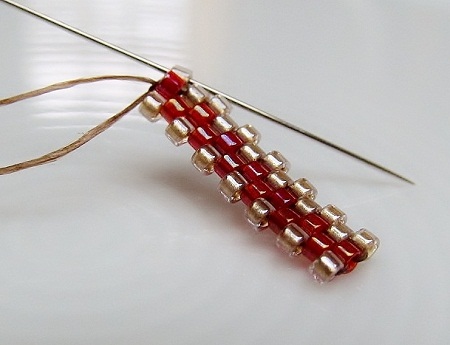
Odd-count flat peyote - knot with tail end

SEE - part 2

TIPS and TRICKS for NEWBIES – the turnaround of odd-count flat peyote - part 2

CONTINUATION: the odd-count flat peyote

  • then go back through the bead you just added, but in the opposite direction
  • after this you pick up a bead, go through a "high bead" and continue as before

odd-count flat peyote - go back thru last bead

  • the fourth row and all even-count rows are regular ones similar to even-count peyote
  • the fifth row and all odd-count rows are ending as followed: pick up the last bead and go with your needle under the thread at the edge of the previous row to create a loop

  • to find the edge thread: it is the visible thread at the edge of your work between the holes of the two last beads
  • then pass back in opposite direction through that last bead you added, pick up a bead and continue as usual

Odd-count flat peyote - turnaround

The figure 8 turn:

  • the figure 8 turn is a sturdier way of creating a turnaround as you zigzag through more beads, but it will also make your piece stiffer on one side
  • at the end of the third row and all odd-count rows: pick up the last bead and make a turn
  • going down in opposite direction: go back through the bead straight beneath it, zigzag by going through the bead in diagonal in the row beneath
  • going up and return: go straight up through the bead above in the opposite direction, continue and go down through the next bead in diagonal
  • you have arrived at the end of the one but last row
  • make a straight step-up by going back through the last bead you added
  • continue in the same way as with the even-count peyote stitch

Odd-count peyote - figure 8 turn

Advice:

  • to start your odd-count flat peyote use the figure 8 turn and then switch to the traditional turnaround
  • use the figure 8 turns when creating a fan shape

Do not forget: have fun, because practice makes perfect. See you soon!

TIPS and TRICKS for NEWBIES – puzzling with delica … the even-count flat peyote stitch - part 1

For those who love puzzling and sewing there is the flat peyote stitch that results in a smooth band built up from the width. It is done with small Japanese tubular beads which have a different name depending on the brand. By Miyuki they are called Delica, by Toho Treasures and Aiko, but both refer to a similar product.

Note: The peyote stitch gives the same result as the brick stitch, but differs in structure.

flat peyote stitch in delica

The simplest application - the even-count flat peyote band:

For this you use an even number of beads which will nest in each other as the teeth of a zipper. This means that from a visually point of view, just as a puzzle piece, a portion of the bead always belongs to the next row.

In addition to the flat peyote with an even number of beads, there exits both the possibility to work with an odd number of beads, by which one forms a diagonal line, as the possibility to work circular in order to create a cord. Moreover, there is a rapid method in which one adds two beads at the same time.

Difficulty:

Puzzling or following a regular pattern is not always easy and errors stand out. Therefore, it is highly recommended making a test piece and begin with a simple pattern. You could also make a sample in Japanese seed beads 8/0 in order to get used to the thread path.

Supplies for a sample:

  • Delica 11/0 or seed beads 8/0 in three colors
  • here the sample is made of: 8/0 seed beads in color a (turquoise blue frosted AB), color b (peacock emerald green frosted AB) and color c (silver-lined frosted turquoise green)
  • calculation of the quantity of beads: bandwidth divided by bead width times two
  • for example, if you want a width of 3 cm (30 mm) in 8/0 seed beads (3 mm) then you do the following calculation - 30 mm : 3 mm x 2 = 20 beads
  • why this multiplication: the number of beads you set-up corresponds to the total of the first and second row
  • s-lon thread D or Aa
  • James John needles no. 12 for size 11/0 beads or no. 10 for 8/0 beads
  • scissors and a beading surface

Weaving instructions for a sample in even-count flat peyote:

  • take a comfortable length of thread
  • leave a long tail end, about 15 cm
  • add a stopper bead (in a different color) and fix it by passing twice through the bead
  • add on a seed bead and go through it twice in order to fix the first bead
  • pick up an even number of beads in alternating colors a and b

flat even-count peyote - even number of beads at start

  • keep the tension in your thread by sliding the thread behind your ring finger
  • you do not start weaving until the third row, to begin you pick up a bead in color c and go through the second bead (color b) from the end, allowing the beads in color a to drop next to each other
  • in other words, this shifts the first row and drops it a half-height downwards

even-count peyote - starting row three

SEE - part 2

TIPS and TRICKS for NEWBIES – puzzling with delica … the even-count flat peyote stitch - part 2

CONTINUATION: the even-count flat peyote stitch

  • continue picking up a bead in color c and go through a bead in color b until you reach the end of the row

flat peyote - building up third row

  • pull the thread constantly until the X motif is visible
  • at the end of the row you go through the first seed bead you strung

flat peyote - tightening third row

  • turn your work and start the fourth row by picking up a bead in color a and go through a bead in color c, repeat until the end of the row
  • in other words, to start a new row you pick up a new bead and go through the last bead of the previous row

even-count peyote - fourth row

  • as the work progresses, peyote becomes easier, so please persist during the first four rows
  • to end a thread, zigzag several times through your piece – to start a new thread you do exactly the same
  • to count the number of rows, count the end beads in a zigzag pattern
  • repeat this exercise in a single color beads

Once you have mastered these exercises, you may draw geometrical patterns on graph paper and convert them into jewelry.

Note:

For those who want to go professional with this stitch, there are both paying and free software programs, such as

to convert images/photos into color grids that correspond to Delicas and to assist you in giving shape to your ideas.

Enjoy your creation ... and buy your beads @ https://dunebeads.com/en/tiny-beads !

Did you =Like= this article ? Have fun. See you soon!

TIPS and TRICKS for NEWBIES – a daisy for Daisy … the Daisy Chain Stitch - part 1

The daisy chain (bead version) is a lovely stitch to create bracelets or anklets … and even a ring. Moreover, you can make it as playful or upscale as you wish, because you may use any type of bead, from glass to gemstone beads and from seed beads size 11/0 to 6x6 mm beads … and once you understand the stitch, you can embellish the result to end up with a very different looking bracelet that does not seem to have any flowers at all.

Idea: create the bracelet in your birthstone or the color of it – for September, see http://dunebeads.com/en/september-s-birthstones-in-blue-from-rest-to-creativity

Difficulty:

It is a stitch that will learn you to find your own perfect thread tension. You will need to keep the thread tight with equal tension to create the design, because if there is too much tension, your bracelet will not stay flat and if you do not have enough tension the center bead will not sit nicely in the middle.

Supplies for a bracelet with 4x4 mm beads:

  • 4x4 mm in two colors
  • 6 lbs Fireline thread or S-lon D
  • size 10 needles
  • scissors and beading surface

Supplies for a bracelet with 11/0 or 2x2 mm beads:

  • 11/0 seed beads or 2x2 mm beads in two colors
  • 4 lbs Fireline thread or S-lon Aa
  • size 10 or 12 needles
  • scissors and beading surface

Weaving instructions Daisy Chain with 4x4 mm beads:

  • take a comfortable length of thread
  • leave a long tail end, about 20 cm, to control the tension and to attach a clasp
  • add a stopper bead (in a different color) and fix it with a knot
  • pick up 6 beads, or 8 beads if you work with 11/0 seed beads, but always an even number

daisy chain bracelet - starting

  • create a loop: go through all the beads till the tail end and continue the circle till the middle bead on the opposite side of the tail end
  • arriving at 3th beads past the tail end, you pick up one accent bead in another color for the center of the daisy

daisy chain - ready for central bead

  • now you have to go back to the tail end and thread the needle through the bead next to it in the opposite direction
  • consequently, you work on the opposite side in parallel to the bead where you came from
  • to tighten the structure and the round shape, pull the thread toward you (never away from you)
  • as a result, the center bead sits right in the middle of the flower

daisy chain - adding central bead

SEE - part 2

TIPS and TRICKS for NEWBIES – a daisy for Daisy … the Daisy Chain Stitch - part 2

CONTINUATION: the Daisy Chain Stitch

  • the bead you just went through is also a connecting leaf-bead of the next flower
  • therefore, you will ***pick up only 5 beads (instead of 6 beads) - always an uneven number -
  • and thread back through that single bead the two flowers have in common

daisy chain bracelet - adding second flower

  • pick up one center bead and go back to the middle of the circle on the opposite side
  • check out the structure of the flower: it needs to have two beads on each side which do not connect with the preceding flower
  • simply put the flower is made of: 1 connecting bead, 2 non connecting beads, 1 connecting bead and 2 non connecting beads
  • thread through that single bead on the opposite side, respecting the parallel direction, so the holes of all the center beads are always facing in the same direction***
  • repeat *** … ***
  • when you have obtained the desired length, feel free to reinforce the structure and do another pass through the beads
  • attach a clasp and enjoy your work

Note:

  • the center bead does not necessarily need to have the same size as the leaf-beads, you could replace it by a bigger size, making it more noticeable
  • the sides of the flower garland offer you another opportunity to be creative and may be embellished
  • example: bracelet in embellished daisy chain with 16 seed beads size 11/0, of which 3 connect and a 6x6 mm central bead.

Daisy chain bracelet parisian lights

Thank you for choosing your beads @ http://dunebeads.com/en/czech-fire-polished-round-beads !

Do not forget: have fun, because practice makes perfect. See you soon!

TIPS and TRICKS for NEWBIES – weaving a filled tubular netting or how to fill a “basket” with beads - part 1

Who does not love a gorgeous rope necklace ? Well, you are in for a treat, because the filled tubular netting stitch guarantees you a supple rope that does not collapse. The moreover, the technique is versatile as you can use it with 3 mm, 4 mm or 6 mm beads. Just remember that 3 mm beads will give you a 6 mm diameter, 4 mm beads will create a 8 mm diameter and 6 mm beads a 12 mm diameter rope. So get out your favorite beads … and seed beads.

Supplies for a 12 mm diameter necklace rope:

  • 6x6 mm filler beads : glass beads or gemstone beads
  • 18 g. Czech seed beads 11/0 in a contrasting color (= A color)
  • and preferably also some 11/0 in a secondary matching color (= B color), which will become your crossover bead color – strictly speaking, the second color is only there to make it easier for you to follow the pattern
  • S-lon thread
  • size 10 needles
  • scissors

Instructions – weaving a filled tubular netting:

  • before starting, lay out some small piles of 4 seed beads in color A so you can concentrate wholly on the process and structure
  • to start: pick up a 6 mm filler bead, a seed bead B, a 6 mm filler bead, a seed bead B, a 6 mm filler bead and a seed bead B
  • consider those seed beads between the 6 mm beads as your first crossover beads

  • form a circle by passing a second time through all the beads, but continue, past the tail end through the 6 mm bead and the first crossover seed bead
  • now you will start to make the petals in which you will place your 6 mm beads, together they form a kind of basket

  • **pick up 4 seed beads in color A, 1 in color B and 4 in color A
  • pass your needle through the next crossover bead
  • start over: 4 x color A, 1 x color B, 4 x color A
  • pass through the following crossover bead
  • pick up 4 in color A, 1 in color B, 4 in color A
  • and pass through the next crossover bead – you have created three petals

  • as those petals need to form a basket for the filler beads, you push them slightly up and tighten the thread
  • now you need to create a step-up and in order to do so you go through the next 5 seed beads = meaning, you go through 4 seed beads in color A and 1 crossover bead in color B to end up at the top of the petal.

SEE - part 2

TIPS and TRICKS for NEWBIES – weaving a filled tubular netting or how to fill a “basket” with beads - part 2

CONTINUATION - weaving a rope in filled tubular netting

  • you are ready to restart the process and fill the basket: pick up a 6 mm filler bead and pass through the next crossover bead, repeat this two more times
  • as 6 mm filler beads are quite heavy, especially gemstone beads, give them a second pass through to reinforce the structure**

  • and there you are ready to create the petals again: pick up 4 seed beads in color A, 1 in color B and again 4 in color A and pass your needle through the next crossover bead, repeat two more times
  • continue like **this** till you obtain the desired length
  • to finish: create the three petals, make a step-up and continue as usual, but instead of using a 6 mm filler bead, replace it with a seed bead. This will tighten the structure.
  • Now you are ready to add the clasp of your choice.

In short, your structure consists of three petals you push up to form a basket, after which you go to the top of a petal to fill up the basket.

Attention:

  • If you choose to work with only one color seed beads, it is advisable to lay out piles of 9 seed beads to avoid mistakes.

Note:

  • when using 4 mm filler beads, you will probably need only 3 seed beads in color A at each side of the crossover bead instead of 4 seed beads in color A.
  • this technique can also be used to make a lovely pendant.

Thank you for choosing your beads @ http://dunebeads.com/en/czech-fire-polished-round-beads !

Did you =Like= this article ? Have fun. See you soon!

TIPS and TRICKS for NEWBIES – small (jump) rings, big worries?

The jump ring exists in two versions: a cut through or sawed one and a soldered one, or in other words an open and a closed ring.

Open jump rings serve to make connections and will therefore bundle loose parts in a flexible way, going from charms or pendants to rings and clasps.

Choosing the right jump ring:

A. Material:

As you want to bend the jump ring, you, as a newbie, will choose them in soft to medium hard materials such as aluminum, copper or silver. Remember that steel is very hard and you will need a good pair of pliers …

In terms of quality and for professional use, it is recommended to choose chainmail (chain mail/chain maille) jump rings. An artisan will also solder the open silver jump ring, linking the clasp to a precious handmade jewel. But as for now, we are not there yet.

open jump rings

B. The jump ring size:

The jump ring may be an elegant accent of your design or something that you rather like to conceal inconspicuous. In the latter case and for instance, when attaching a toggle clasp, you measure the size of the eyelet of the clasp and then choose a similar size for your jump ring. With a medium-sized lobster clasp, you will usually need a 5 mm jump ring.

However, you should not only take account of the outer diameter of the jump ring, but also of the inside diameter ... the thicker the wire, the smaller the inner area.

C. Determining the inside diameter:

And the gauge or the wire size, you will ask yourself ...

We make it simple: to link components you usually choose between these two sizes which you need to have in stock:

  • 20 gauges: for earrings and lightweight elements
  • 18 gauges: for clasps and pendants

Remember: The smaller the gauge number, the thicker the wire!

SEE - Part 2

TIPS and TRICKS for NEWBIES – small (jump) rings, big worries ... the technique

Technique - attaching a jump ring in 4 easy steps

See animation – https://www.youtube.com/watch?v=p7bo5ZDDosY&rel=0

Creating jump rings manually

In case of need or if you work with colored wire it is useful to make your own rings.

Supplies:

  • a cylindrical rod (dowel or mandrel) in a size that is slightly smaller than the one you wish to obtain, you could also use large wooden nails or pins
  • a flush cutter
  • soft to half-hard wire, such as soft copper wire of Artistic Wire

Instructions:

  • cut off about 15 to 20 cm wire
  • push a piece of wire with your thumb firmly against the rod
  • wrap the copper wire with your dominant hand tightly around the rod till about 2 cm from the end
  • pull out the rod and gently pull the wire a little bit apart so you can easily continue working
  • with the straight edge of the cutter and starting at the bottom, cut the rings
  • disregard the first and the last jump ring
  • the cut wire will slightly spring back: the harder the wire, the more springback and as a consequence the bigger the jump rings will be.

Enjoy your creation ... and buy your findings @ https://dunebeads.com/en/metal-jewelry-findings !

Do not forget: have fun because practice makes perfect. See you soon!